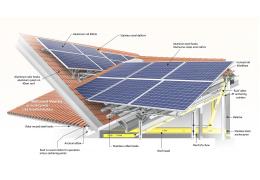
This fixing kit for slate roofs is designed to securely install your photovoltaic panels on any type of slate roof. The contents of the kit adapt automatically depending on the number of panels and the layout (portrait or landscape) you select in the options.
The kit contains everything you need for a reliable, robust and durable installation, adapted to your solar panels (frame thickness depending on the option chosen).
Key features
Choose the number of panels and the layout (portrait/landscape) in the options.
Please note: for an installation with two or more rows of panels (e.g. 2 rows of 6 panels), you will need to select two mounting kits.
The kit components vary according to the number of panels. Rail connectors are included from 2 panels in landscape orientation and 3 panels in portrait orientation (see table at the bottom of the page).
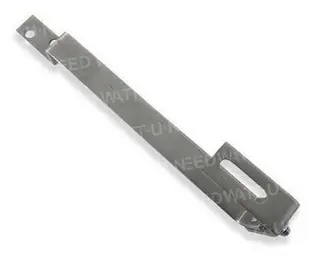
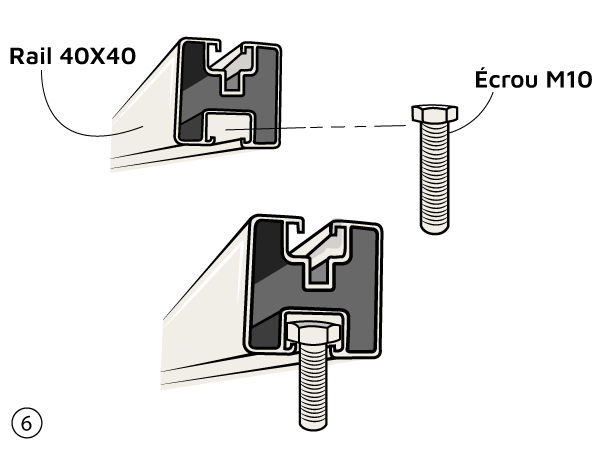
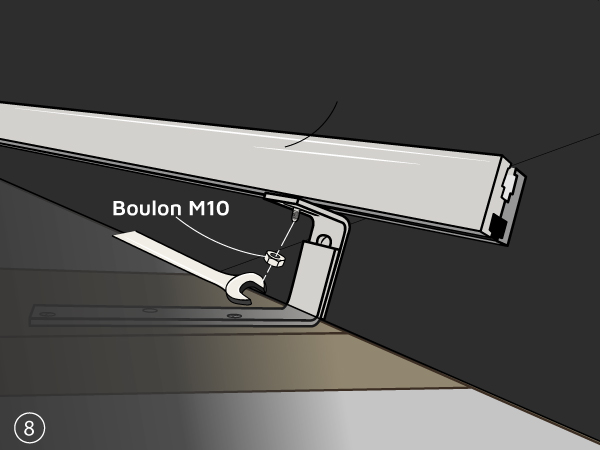
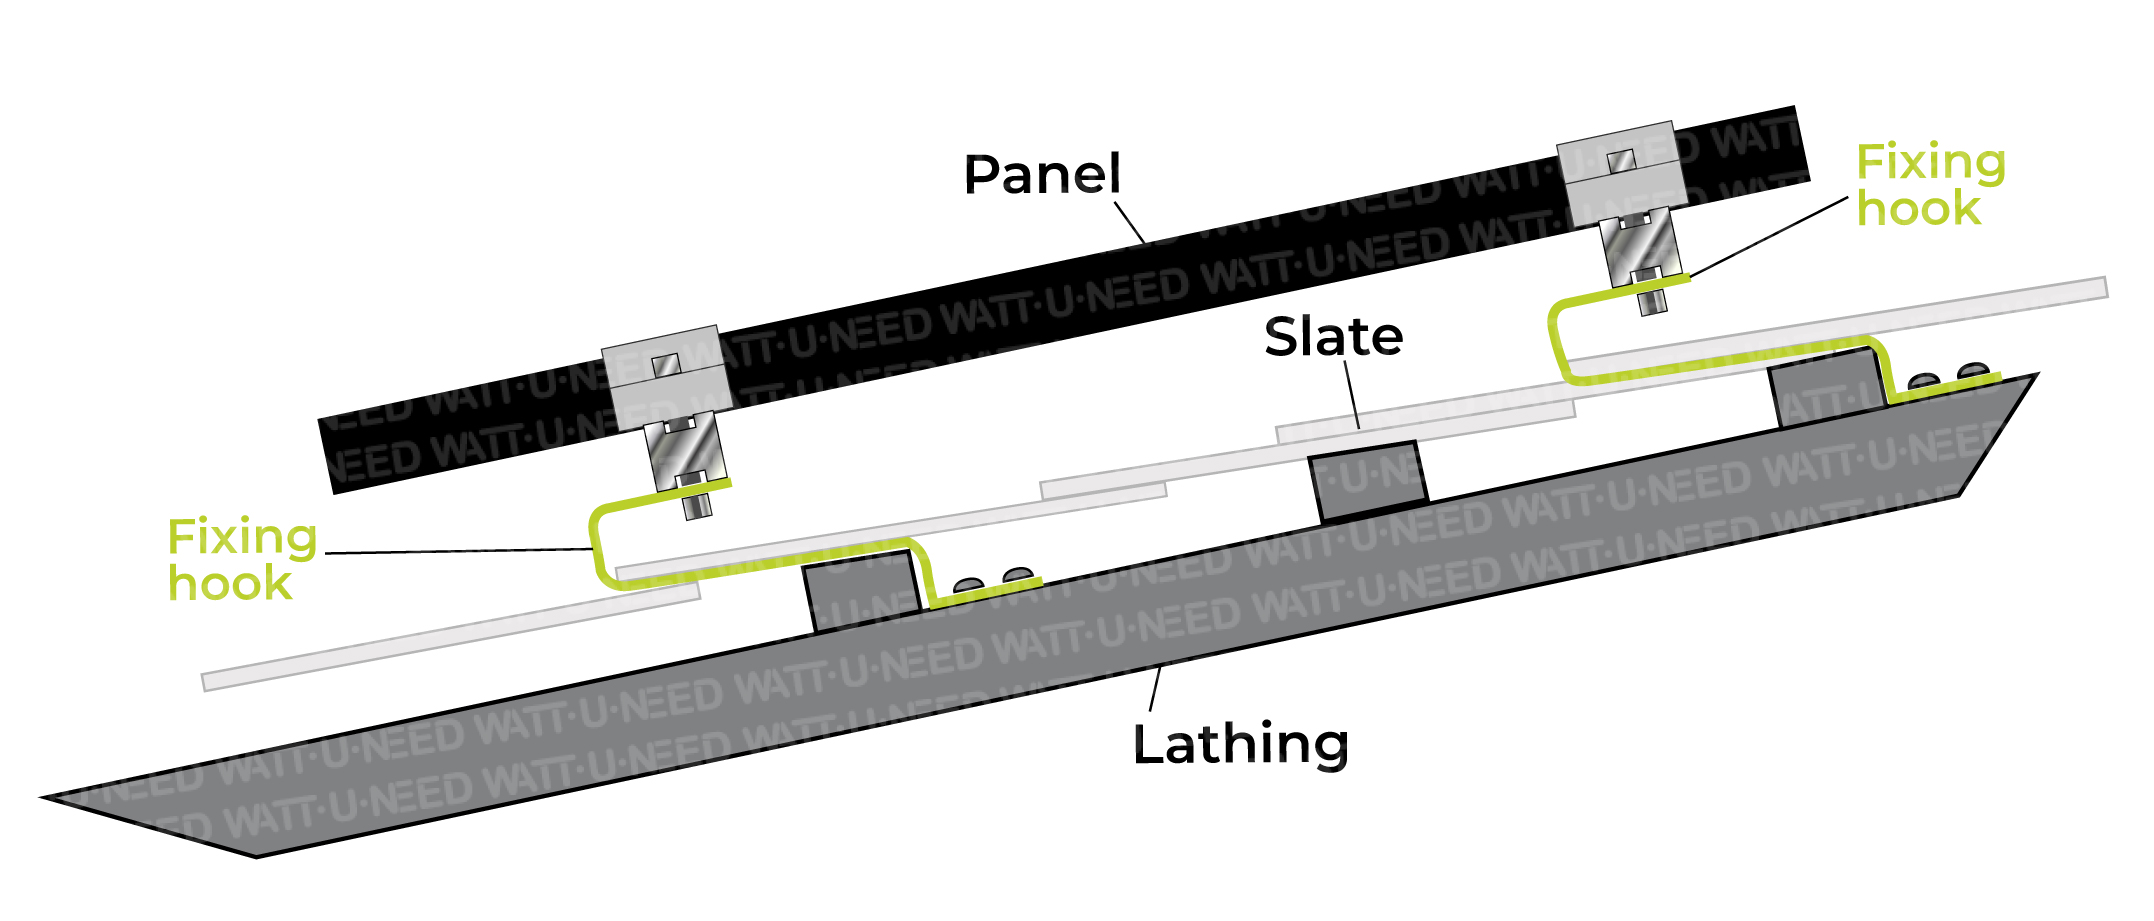
Frame fixing to support rails.
Product details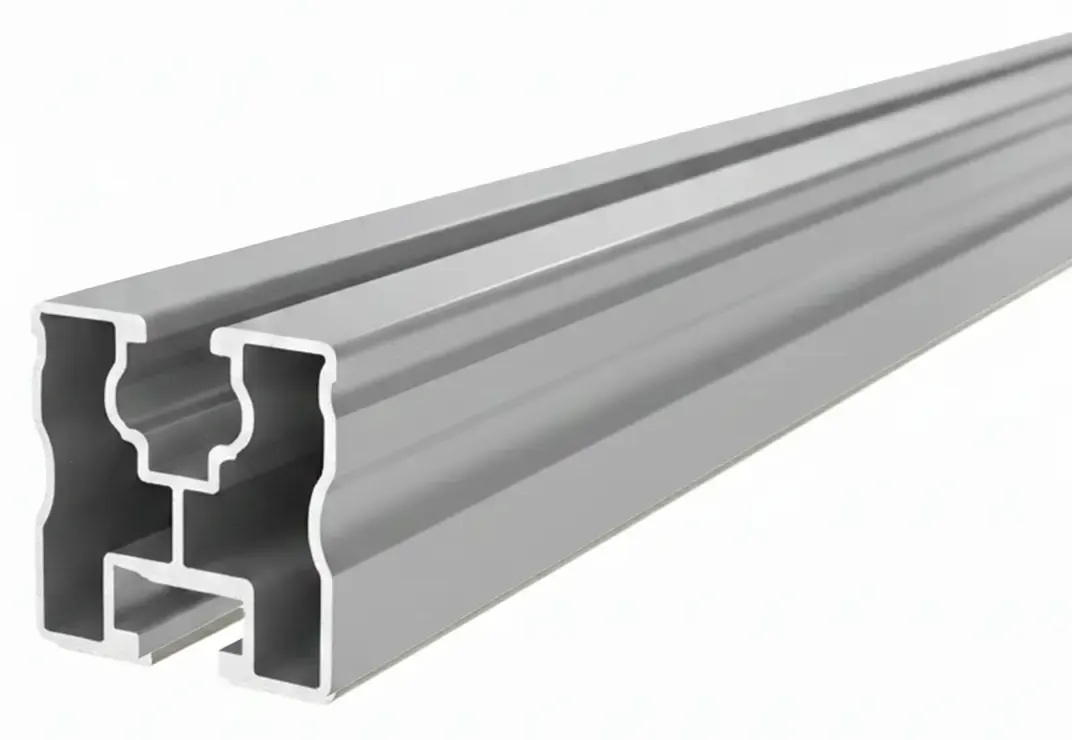
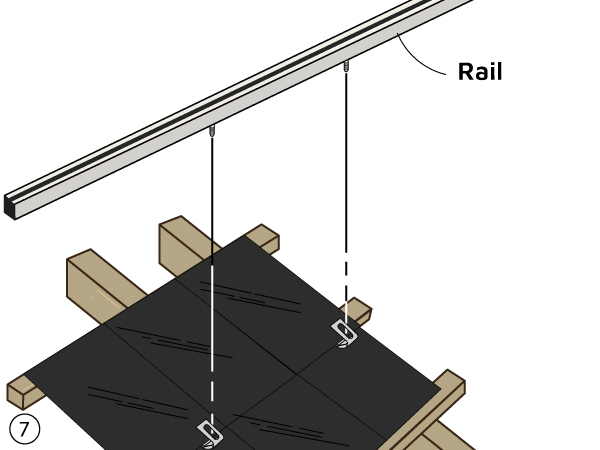
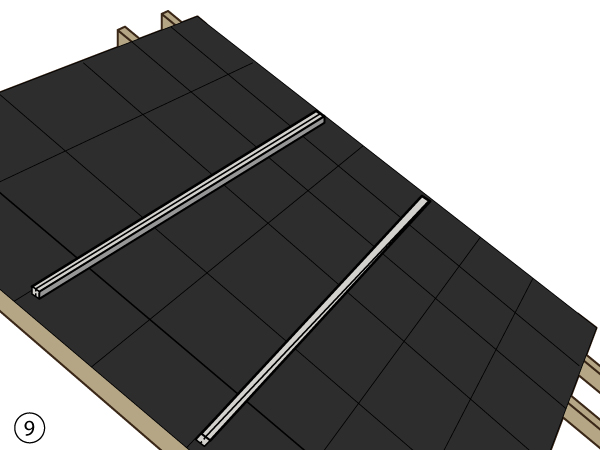
Main support for the structure of the photovoltaic system.
Product details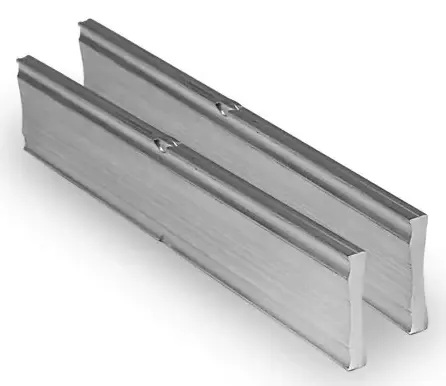
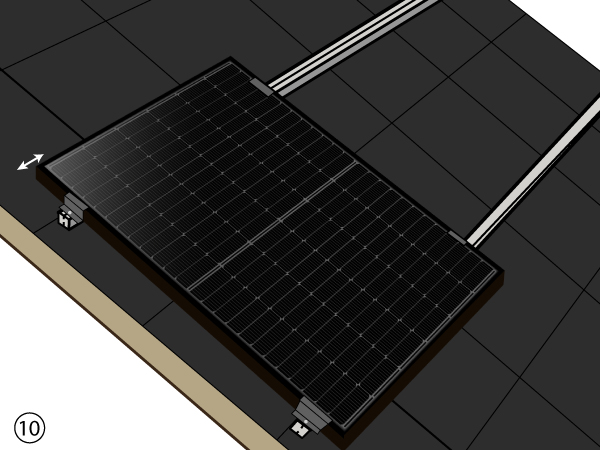
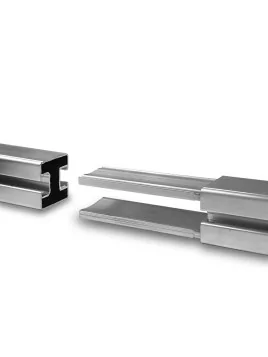
Rail assembly for longer rows. Included from two panels in landscape orientation and three panels in portrait orientation.
Product details
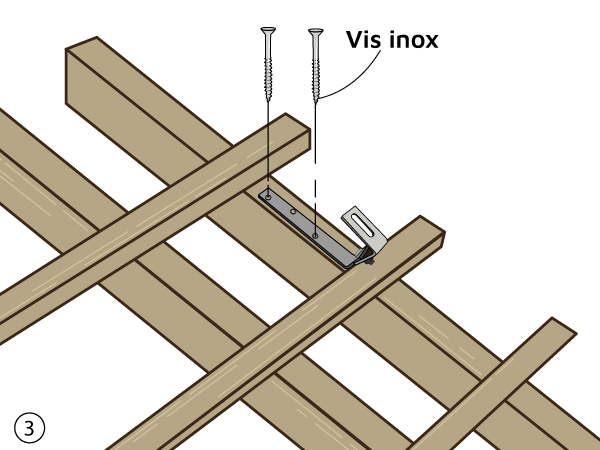
High-strength screws for securely anchoring hooks.
Product details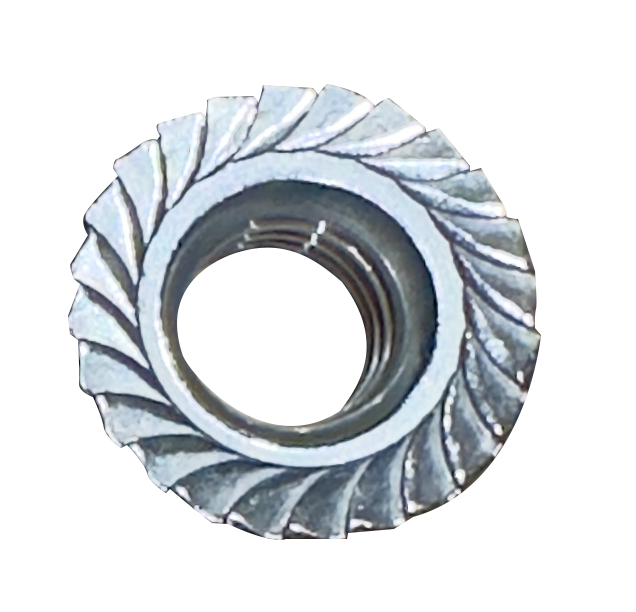
For quick manual tightening during installation.
Product details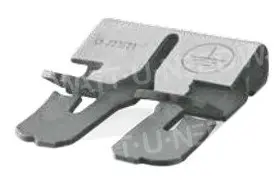
Ensure electrical continuity and earthing.
Product details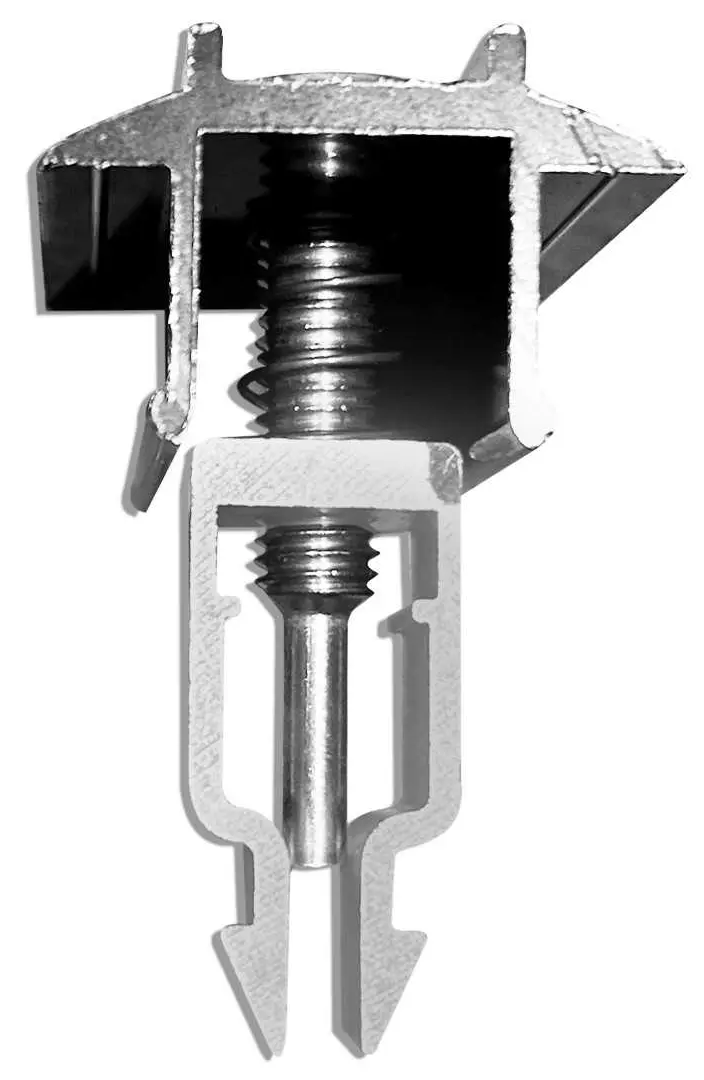
Quick fixing between each panel
Product details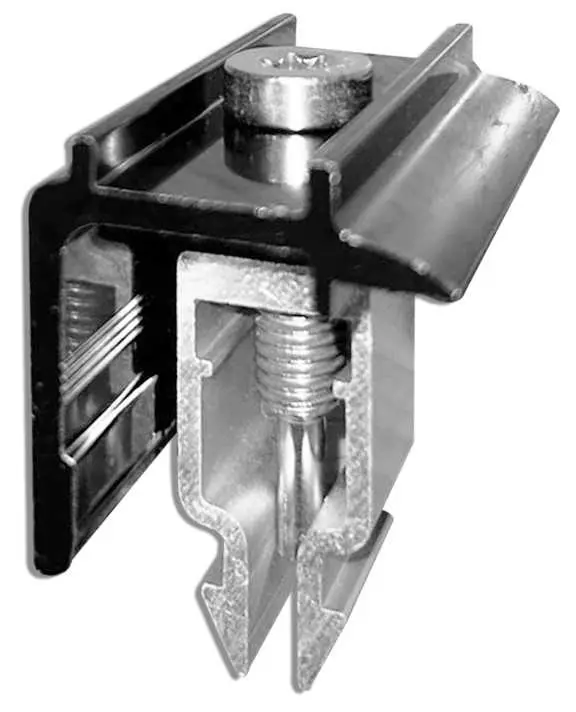
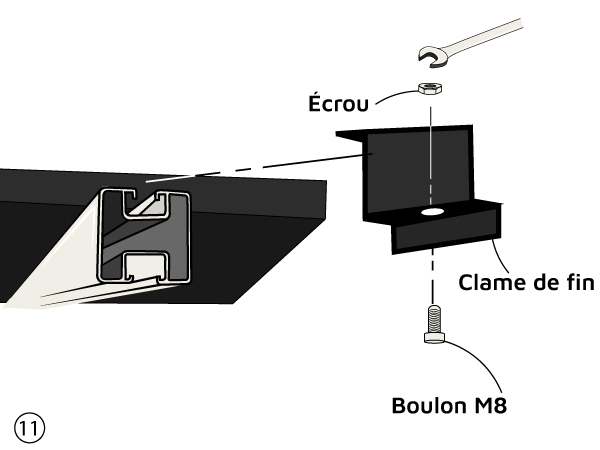
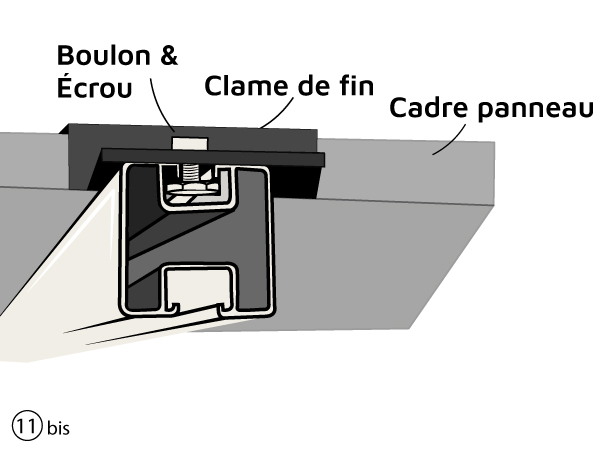
Securely holds panels at the end of the structure.
Product details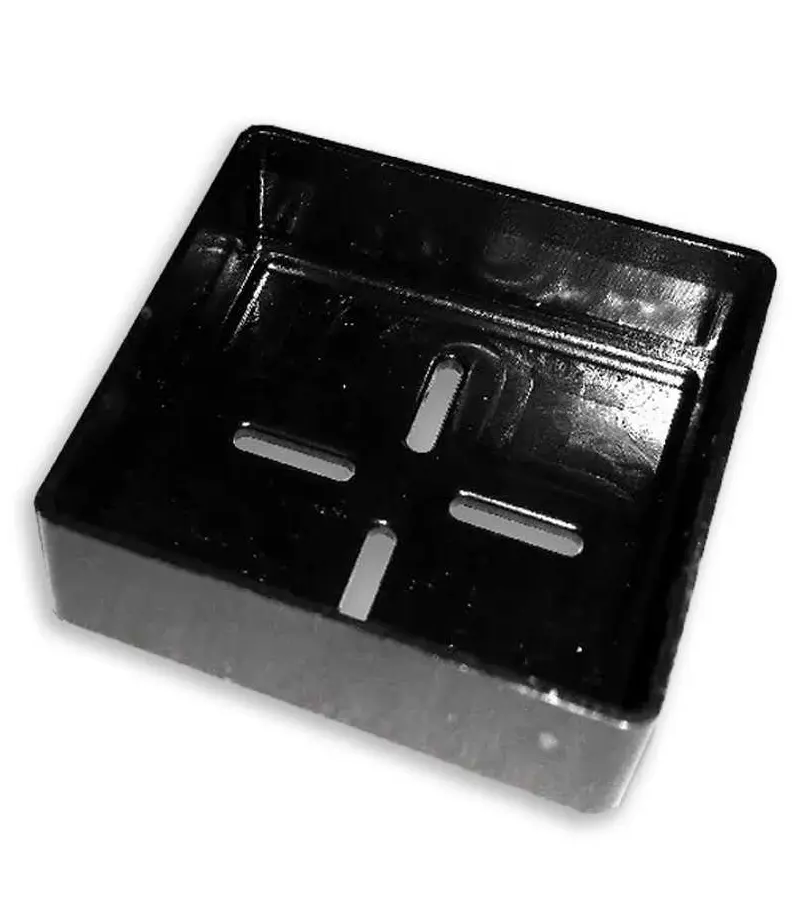
For an aesthetic finish and long-lasting protection of the mounting rails.
Product details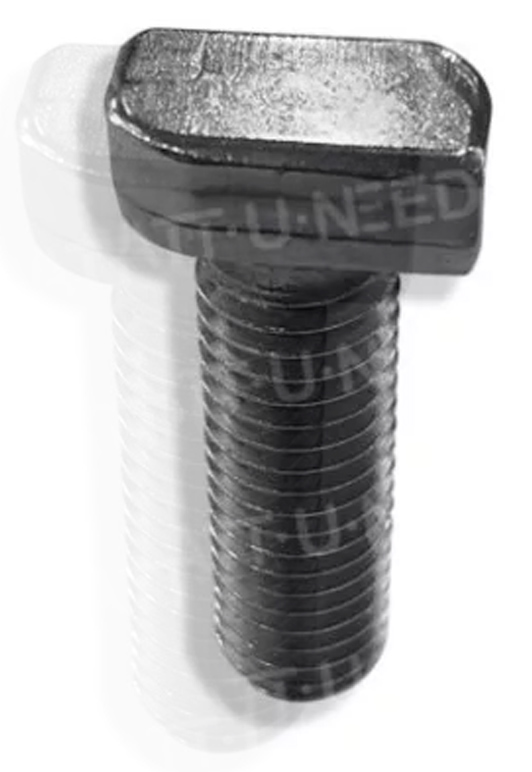
Ideal for reliable and easy fastening.
Product detailsWatch the complete video series to install your solar panel mounting kit on tiled roofs. Part 1 covers preparation and rail installation, while Part 2 details panel mounting and final adjustments for optimal stability.
The fixing kit is suitable for all slate roofs. Thanks to its options, it can be adapted to the layout of your panels.
The fixings are compatible with standard-sized panels (approximately 1.60 m x 1 m).
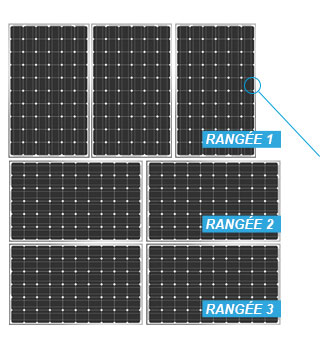
Choose the number of panels per row, arranged in portrait or landscape.
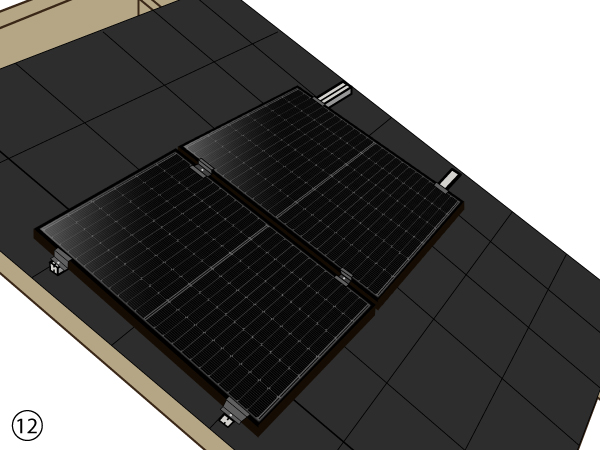
Example: the layout shown opposite requires 3x the Fixing Kit product:
The clamp is used to fix the panel to the aluminium rail. Its height must match the thickness of your panel's frame to ensure a secure hold.
Available heights: 8 - 30 - 35 - 40 - 45 - 50 mm
Portrait panels
| Number of panels | Rail (m) | Rail details* | Connector | Double-adjustment hook | Structural screw | Middle clamp | End clamp | M10 hammer head bolt | M10 hex nut | Rayvolt | Rail end cap |
|---|---|---|---|---|---|---|---|---|---|---|---|
| 1 panel | 2,4 | (2 x 1,20m) | 0 | 4 | 8 | 0 | 4 | 4 | 4 | 1 | 4 |
| 2 panels | 4,8 | (2 x 2,40m) | 0 | 6 | 12 | 2 | 4 | 6 | 6 | 2 | 4 |
| 3 panels | 7,2 | (4 x 1,80m) | 2 | 8 | 16 | 4 | 4 | 8 | 8 | 3 | 4 |
| 4 panels | 9,6 | (4 x 2,40m) | 2 | 10 | 20 | 6 | 4 | 10 | 10 | 4 | 4 |
| 5 panels | 12 | (4 x 2,40m et 2 x 1,20m) | 4 | 12 | 24 | 8 | 4 | 12 | 12 | 5 | 4 |
| 6 panels | 14,4 | (6 x 2,40m) | 4 | 14 | 28 | 10 | 4 | 14 | 14 | 6 | 4 |
| 7 panels | 16,8 | (6 x 2,40m et 2 x 1,20m) | 6 | 16 | 32 | 12 | 4 | 16 | 16 | 7 | 4 |
| 8 panels | 19,2 | (8 x 2,40m) | 6 | 18 | 36 | 14 | 4 | 18 | 18 | 8 | 4 |
| 9 panels | 21,6 | (8 x 2,40m et 2 x 1,20m) | 8 | 20 | 40 | 16 | 4 | 20 | 20 | 9 | 4 |
| 10 panels | 24 | (10 x 2,40m) | 8 | 22 | 44 | 18 | 4 | 22 | 22 | 10 | 4 |
| 11 panels | 26,4 | (10 x 2,40m et 2 x 1,20m) | 10 | 24 | 48 | 20 | 4 | 24 | 24 | 11 | 4 |
| 12 panels | 28,8 | (12 x 2,40m) | 10 | 26 | 52 | 22 | 4 | 26 | 26 | 12 | 4 |
| 13 panels | 31,2 | (12 x 2,40m et 2 x 1,20m) | 12 | 28 | 56 | 24 | 4 | 28 | 28 | 13 | 4 |
| 14 panels | 33,6 | (14 x 2,40m) | 12 | 30 | 60 | 26 | 4 | 30 | 30 | 14 | 4 |
| 15 panels | 36 | (14 x 2,40m et 2 x 1,20m) | 14 | 32 | 64 | 28 | 4 | 32 | 32 | 15 | 4 |
| 16 panels | 38,4 | (16 x 2,40m) | 14 | 34 | 68 | 30 | 4 | 34 | 34 | 16 | 4 |
| 17 panels | 40,8 | (16 x 2,40m et 2 x 1,20m) | 16 | 36 | 72 | 32 | 4 | 36 | 36 | 17 | 4 |
| 18 panels | 43,2 | (18 x 2,40m) | 16 | 38 | 76 | 34 | 4 | 38 | 38 | 18 | 4 |
| 19 panels | 45,6 | (18 x 2,40m et 2 x 1,20m) | 18 | 40 | 80 | 36 | 4 | 40 | 40 | 19 | 4 |
| 20 panels | 48 | (20 x 2,40m) | 18 | 42 | 84 | 38 | 4 | 42 | 42 | 20 | 4 |
* The details of the rails are given for information only and depend on the size of the panels.
Panels in landscape orientation
| Number of panels | Rail (m) | Rail details* | Connector | Double-adjustment hook | Structural screw | Mid clamp | End clamp | M10 hammer head bolt | M10 hexagonal nuts | Rayvolt | Rail end cap |
|---|---|---|---|---|---|---|---|---|---|---|---|
| 1 panel | 3,6 | (2 x 1,80m) | 0 | 4 | 8 | 0 | 4 | 4 | 4 | 1 | 4 |
| 2 panels | 7,2 | (4 x 1,80m) | 2 | 6 | 12 | 2 | 4 | 6 | 6 | 2 | 4 |
| 3 panels | 10,8 | (6 x 1,80m) | 4 | 10 | 20 | 4 | 4 | 10 | 10 | 3 | 4 |
| 4 panels | 14,4 | (8 x 1,80m) | 6 | 12 | 24 | 6 | 4 | 12 | 12 | 4 | 4 |
| 5 panels | 18 | (10 x 1,80m) | 8 | 16 | 32 | 8 | 4 | 16 | 16 | 5 | 4 |
| 6 panels | 21,6 | (12 x 1,80m) | 10 | 18 | 36 | 10 | 4 | 18 | 18 | 6 | 4 |
| 7 panels | 25,2 | (14 x 1,80m) | 12 | 22 | 44 | 12 | 4 | 22 | 22 | 7 | 4 |
| 8 panels | 28,8 | (16 x 1,80m) | 14 | 24 | 48 | 14 | 4 | 24 | 24 | 8 | 4 |
| 9 panels | 32,4 | (18 x 1,80m) | 16 | 28 | 56 | 16 | 4 | 28 | 28 | 9 | 4 |
| 10 panels | 36 | (20 x 1,80m) | 18 | 30 | 60 | 18 | 4 | 30 | 30 | 10 | 4 |
| 11 panels | 39,6 | (22 x 1,80m) | 20 | 34 | 68 | 20 | 4 | 34 | 34 | 11 | 4 |
| 12 panels | 43,2 | (24 x 1,80m) | 22 | 36 | 72 | 22 | 4 | 36 | 36 | 12 | 4 |
| 13 panels | 46,8 | (26 x 1,80m) | 24 | 40 | 80 | 24 | 4 | 40 | 40 | 13 | 4 |
| 14 panels | 50,4 | (28 x 1,80m) | 26 | 42 | 44 | 26 | 4 | 42 | 42 | 14 | 4 |
| 15 panels | 54 | (30 x 1,80m) | 28 | 46 | 92 | 28 | 4 | 46 | 46 | 15 | 4 |
| 16 panels | 57,6 | (32 x 1,80m) | 30 | 48 | 96 | 30 | 4 | 48 | 48 | 16 | 4 |
| 17 panels | 61,2 | (34 x 1,80m) | 32 | 52 | 104 | 32 | 4 | 52 | 52 | 17 | 4 |
| 18 panels | 64,8 | (36 x 1,80m) | 34 | 54 | 108 | 34 | 4 | 54 | 54 | 18 | 4 |
| 19 panels | 68,4 | (38 x 1,80m) | 36 | 58 | 116 | 36 | 4 | 58 | 58 | 19 | 4 |
| 20 panels | 72 | (40 x 1,80m) | 38 | 60 | 120 | 38 | 4 | 60 | 60 | 20 | 4 |
* Rail details are for guidance only and depend on panel size.
Yes, this kit is compatible with most natural and synthetic slates. It is designed to provide a secure mounting without damaging the roof covering.
Yes, the installation is suitable for experienced DIYers. However, it is recommended to follow safety instructions when working on the roof.
Yes, the components are designed to resist corrosion, wind, rain, and temperature variations, ensuring long-lasting durability.
Yes, this kit is specially designed for installing solar panels on slate roofs, providing a stable and secure mounting.
No, the installation can be done using standard tools (drill, wrench, screwdriver). No specialized tools are required.

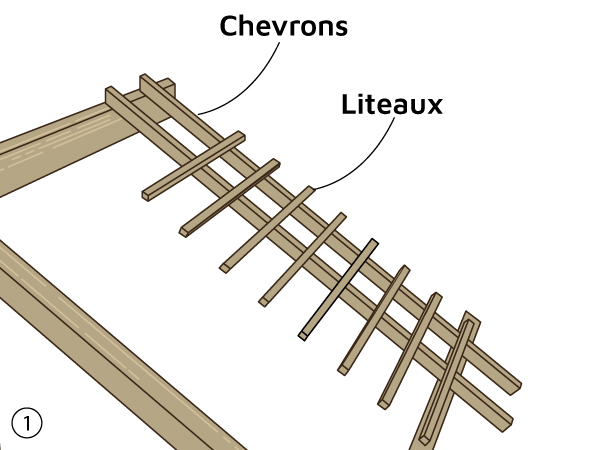
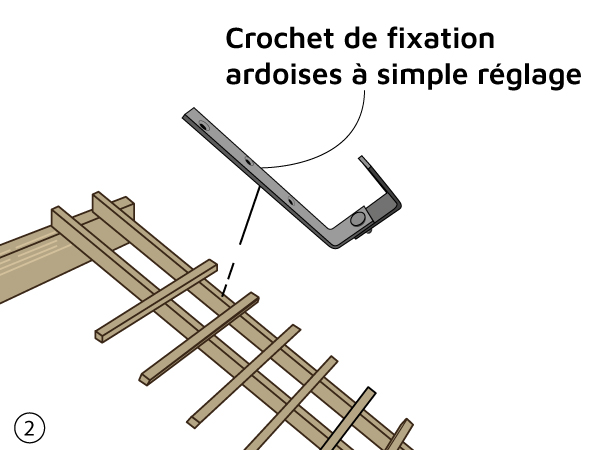
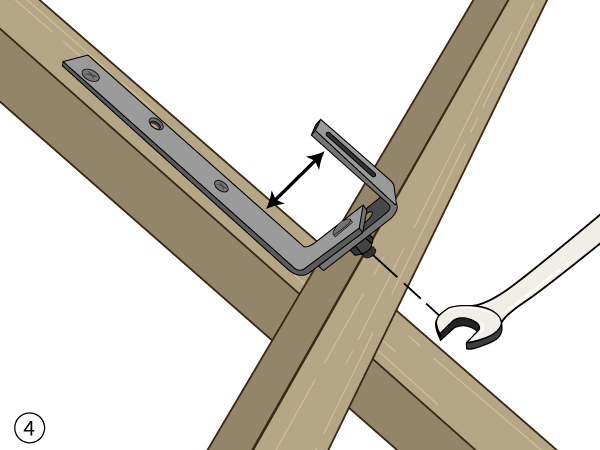
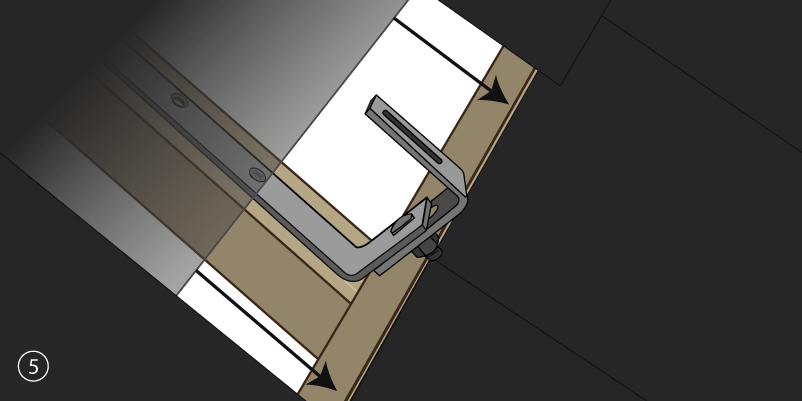
Step-by-step instructions for installation on slate roofs
Installation on a slate roof requires special precautions. Slate is more fragile than tile, so a specialized, methodical approach is essential. If you have any doubts about the technique or strength of the roofing, be sure to consult a qualified professional.
Your photovoltaic system on a slate roof is now ready. Before commissioning, please carry out a complete check of the watertightness and tightness of all connections.
⚠️ For safety reasons and to guarantee watertightness, always have your system checked by a qualified professional specializing in slate roofs.
 Eurocode and solar panel fixings: standards and safety
Fixing kit for slate roofs by Wattuneed is available in our Mounting systems catalog.
Product weight: 2.5 kg. Reference: 0805.


check_circle
check_circle