Installation guide Ground-mounted photovoltaic mounting kit
Step-by-step instructions for ground-mounted installation
📋 Before you start
This guide takes you through the complete installation of your photovoltaic mounting kit. Follow each step methodically to ensure a safe and long-lasting installation.
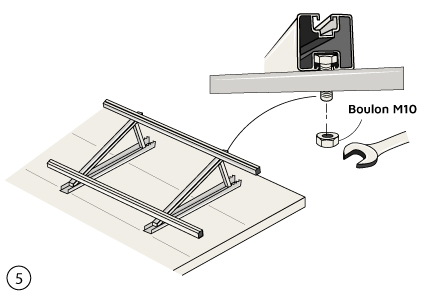
1 SETTING UP THE TRIANGLES
Choice of triangular support
🛠️ Installation
1. Marking: Mark the location according to your configuration and spacing requirements.
2. Positioning: Place the triangles at the locations, opening to the south
3. Tilt: Adjust the angle according to your latitude (30-35° in France).
4. Fixing: Anchor firmly to the ground and check stability
✅ Controls
Perfect alignment
Uniform angle
Stability
Correct spacing
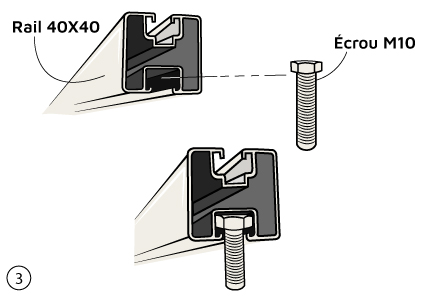
2 FITTING THE M10 NUTS
📦 Hardware
M10 sliding nuts, M10 bolts, washers, springs
🛠️ Installation
1. Insertion: Slide M10 nuts into grooves, position facing holes
2. Alignment: Align nuts, check horizontality and spacing
3. Fixing: Add washer, screw on nut, tighten loosely
4. Check: Check rigidity, absence of play, horizontality
⭐ Advantages of sliding system
- Flexibility: Precise position adjustment
- Ease: No drilling, self-centering system
- Strength: Robust connection, excellent resistance
✅ Controls
Nuts well positioned
Bolts evenly tightened
Rigid structure
Parallel rails
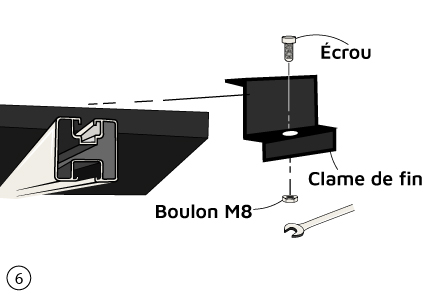
3 FASTENING CLAMPS AND PANEL
📦Material
End clamps (4), middle clamps (depending on config.), M8 bolts
📐 Cam configuration
1 panel: 4 end slats at 4 corners
Multiple panels: 4 end clamps + middle clamps between panels
🛠️Installation
1. Positioning: Place the panel on the rails, center perfectly
2. Clamps: Position end and middle clamps, check that they enclose the frame.
3. Fixing: Insert M8 bolts, screw into sliding nuts, tighten gradually.
4. Adjustment: Check horizontality, absence of play, solidity
Available heights
28mm, 35mm, 40mm, 45mm, 47mm, 50mm (depending on frame thickness)
Benefits
- Safety: firm hold, weather-resistant
- Flexibility: modular system, can be disassembled
- Precision: exact positioning, perfect alignment
✅ Controls
Correctly positioned clamps
Bolts tight
Horizontal panel
Stable installation
🎉 Installation complete!
Your photovoltaic system is now ready. Please make a final check of all fastenings and panel alignment before commissioning.
⚠️ For your own safety, have your system checked by a qualified professional.
2025 WattUNeed - Photovoltaic Installation Guide