ABB Solar Pump Drives ACS355 - 400V three-phase

ABB ACS355 for solar pumping - 400V three-phase

€491.31
Tax included
0799
0712971129429

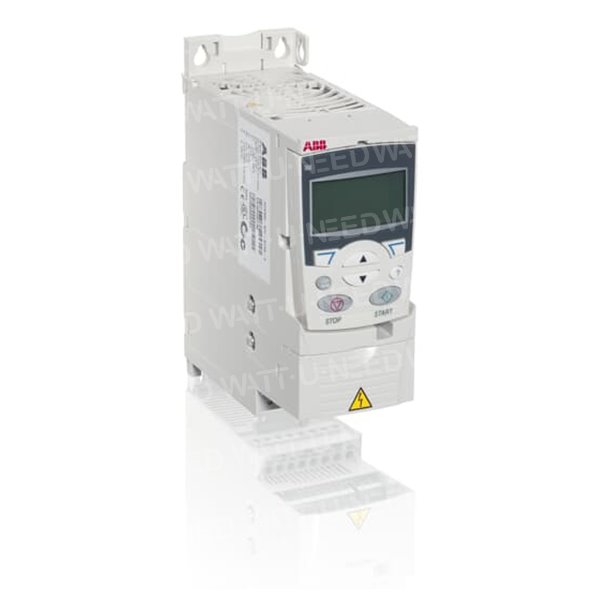
ASC355 speed variator for solar pumping. 
This model is intended to power 400Volts three-phase pumps. 

ABB has specifically developed a range of dimmers for solar pumping applications. The ABB ACS355 frequency dimmers are equipped with software suitable for solar pumping. 


Comments (0)

No customer reviews for the moment.

 ASC355 speed variator for solar pumping


Functional, compact and economical


The ACS355 ABB frequency dimmers are quick to install, set up and put into service.
Very compact and economical, their functional intelligence and high level of security will meet the highest demands for productivity and performance.

These dimmers can be adjusted according to the characteristics of the engine of the pump to be powered.

This model is intended to power 400Volts three-phase pumps.


Applications


The ACS355 is designed to control 400V three-phase pumps. They are equipped with a progressive start function and a detection of dry operation. They protect the engines perfectly from the pumps.


Key points


  • Exceptional compactness and streamlined dimensions.
  • Quick commissioning with application macro programs and micro-console assistants.
  • Secure stop STO (Safe torque-off, SIL3) as standard.
  • Vector control without a sensor.
  • Built-in braking chopper.
  • Micro-console debugging and compatible with the upper range ACS550.
  • ENHANCEd PROTECTION variants IP66 for difficult environments (optional).

Characteristics


Characteristics Benefits Remarks
availability and technical support Divariators are available at all times.
Dedicated network of services and technical support among the most extensive on the market
Fast and reliable delivery
Provides services and technical support in every country in the world
Widest power range in its class (0.37 to 19 kW) The range covers a very wide range of power Reducing the costs of machine manufacturers
Compactness and rationalization of dimensions Highest power density in the category (2.8 kW/dm3)
Same depth and height for the whole range
Simplification of cabinet editing and multivariator applications
Saving space in tight spaces
Secure shutdown STO (SIL3) as standard Integrated and STO-certified function (Safe torque-off)
Preventing untimely start-ups and different types of stops
Fewer external security components
Compliance with the requirements of the Machinery Directive
2006/42/EC by machine manufacturers
Programming Programming in minutes. the software is pre-pogrammé for solar pumping Avoids using an external automaton (API)
Macroprograms and commissioning assistants Preconfiguration of macroprogram E/S (e.g., 3-wire command, motopotentiometer)
Assisted adjustment of many functions: start-up, engine data setting0

Rapid commissioning of the dimmer

FlashDrop box

Loading a set of parameters (among about 20) in a dimmer not connected to the network in a matter of seconds
Simple tool of use that requires no special knowledge

Rapid, easy and reliable predictor of dimmers by large-series machine manufacturers

IP66/67/UL Type 4X protection variant for challenging environments

No special envelopes to use for environments that require enhanced protection. NSF-certified variator

Saving time and money

0799

Specific References

UPC
540000214941
EAN13
5400000033292
New
MCU Update Procedure for Inverters - Corrected Version

MCU Update Procedure for Inverters

Professional Version - Technical Document

Introduction

This document details the complete procedure for performing a Microcontroller (MCU) update on inverters. This operation is essential to maintain optimal equipment performance and integrate the latest software improvements.

A correctly performed update ensures proper inverter operation and extends its lifespan. It is crucial to follow this procedure step by step to avoid any malfunction.

Safety Warnings

CRITICAL ATTENTION

An interrupted update can render the inverter unusable.

Do not disconnect power from the computer or inverter during the procedure.

Avoid putting the computer to sleep during the update.

Ensure your computer battery is sufficiently charged or the computer is plugged into mains power.

Back up all important data before starting the procedure.

Prerequisites

Required Hardware

A computer with an available USB port
USB to RS232 cable provided by us
RS232 to RJ45 cable provided with the inverter
The inverter to be updated
Update files (MCU and DSP) previously extracted

Required Software

"Remote Panel Reflashtool" software installed
Update files decompressed and ready to use
Initial Configuration

Preliminary Checks

Ensure that the update files have been extracted from their compressed archive
Disable automatic sleep mode on your computer to avoid any interruption
Detailed Procedure

1 Inverter Preparation

Stop certain inverter functions:

Completely disable the inverter output
Stop photovoltaic panel (PV) power supply
Keep battery and grid power active to allow communication

Check inverter status:

Ensure the inverter screen is on and functional
Verify that no critical alarms are active

2 Computer to Inverter Connection

Connect the USB cable to the computer:

Use an available and functional USB port
Wait for the operating system to detect the new device

Identify the assigned COM port:

Open Windows Device Manager
Expand the "Ports (COM & LPT)" section
Note the COM port number assigned to the newly connected device
This number will be needed for the update software configuration

Connect the other end of the cable (RJ45) to the inverter COM port:

Ensure the connection is firm and secure
Verify that the inverter recognizes the connection (usually indicated by a light or screen message)

3 MCU Update

Launch the update software:

Run the "Remote Panel Reflashtool" application
Wait for the main interface to display completely

Software configuration:

Select the previously identified COM port in the software settings
Verify that the communication speed is correctly configured (usually automatic)

Update initiation:

Click the "Update MCU" button in the software interface
Select the previously extracted MCU update file
Confirm your selection to start the process

Update monitoring:

Observe the update progress on the computer screen
Do not touch any equipment during this phase
Ensure the computer does not go to sleep
Typical update duration is 5 to 15 minutes depending on the inverter model

MCU update completion:

Wait for the confirmation message indicating the update is complete
Click "EXIT" in the software to properly close the update session

4 DSP Update (if necessary)

Preparation for DSP update:

Keep the inverter and computer connected
Ensure the inverter is still properly powered

DSP update procedure:

Restart the "Remote Panel Reflashtool" application if it was closed
Follow a similar procedure to the MCU, but select the DSP update file
Follow the on-screen instructions to complete this second update
Post-Update Verification

Version Control

Check in the inverter menu that the new firmware version is properly installed
Confirm that the update date matches the operation you just performed

Functional Test

Progressively reactivate all inverter functions
Verify that the inverter output works correctly
Reactivate photovoltaic panel power supply
Observe operation for several minutes to ensure stability
Common Troubleshooting

Inverter does not detect the connection

Check that the cable is properly connected on both sides
Try another USB port on the computer
Restart the inverter and computer

Update failure

Note the displayed error code
Verify that you are using the correct update files for your inverter model
Contact technical support providing the error code

Computer does not recognize the device

Install or reinstall the necessary drivers
Try another USB cable if available
Check in device manager if the device appears with an exclamation mark
Glossary

MCU

Microcontroller, the main "brain" of the inverter

DSP

Digital Signal Processor, processor specialized for signal processing

COM Port

Serial communication port used for connection between computer and inverter

RS232

Serial communication standard for data transmission

Technical Support Contact

In case of persistent difficulty or technical questions, our support team is at your disposal:

Please have your exact inverter model and any error codes available when contacting us.

Technical Document - Inverter MCU Update | Corrected Version

Follow this procedure carefully to ensure proper equipment operation

Loading...